| Taking 3D Photographs |
|
I usually use the former approach, because I don't generally want to take 3D pictures unless something catches my eye that says, "hey, take a 3D photo of me".. 2D pictures usually do just fine, and besides, they cost half as much as 3D pictures to develop as there's only one of each image...
The technique is simple: you decide what you want to take a 3D picture of, line up your viewfinder on something easy to find (the further in the distance the better) and snap it. Then you take one pace sidewards, line up your viewfinder on the same object, and snap it again. The further you walk between images, the more pronounced the 3D effect will be. A pace is good for landscapes, but for close-up work it will exaggerate depth too much. If you're taking pictures of things in the same room as you are, a good approach is to put your weight on one leg, snap, then without moving your feet shift your weight to the other leg and snap again. If you're photographing things that are within reach, just track sideways with your head 10cm or so instead. Alternatively, keep your head still and use a different eye for each shot.
The principal disadvantage with this single-camera approach concerns motion. If it's windy, or there are crowds about - or even birds in the sky - then the second image will have differences that leap out jarringly at you when you resolve them into a single 3D photo. Unless there are things moving very quickly in your viewframe, you can overcome this by using a pair of cameras instead of just one.
Here's what I do: I buy a couple of identical disposable cameras and tape their bottoms together such that the lenses are lined up horizontally. Because this puts the lenses roughly the same distance apart as a pair of eyes, theoretically you should get the same stereoscopic effect using the cameras that your own eyes experience. In practice, though, you won't produce great 3D pictures this way (your eyes can swivel to point at things, but the cameras are permanently parallel to each other). The only kind of range they might work at is for close ups, but as they're generic cameras they usually can't focus on things that close to them.
The solution I adopt for this is to put a block of wood (3cm or so wide) between the cameras before I tape them together. This is good for medium distance shots, and is OKish for long distance ones, too. If I were specifically intending to use the technique for long distance shots, I guess I'd use a longer piece of wood to separate the cameras, so as to bring out the 3D effect better. I've never tried this, though.
When I want to take a 3D photo with the two-camera contraption, I line it up as horizontal as possible and press both cameras' shutter release buttons at once (a bit of a pain as they're asymmetric - one is at the top and the other is at the bottom). Usually I can synchronise the button-pressing close enough that there's no significant movement between the two photos that the cameras take - even gently falling snow is snappable this way once you become practised at it.
![]() Example: Water.
Example: Water.
Image size: 2 x approx. 12K.
The main disadvantage of using a pair of cameras is that the distance between them is fixed, so you can get either good close-ups or good landscapes but rarely good both. Also, if you need a flash you have to make sure that only one of the cameras is going to deliver it.
You might prefer to stick your cameras together side-by-side instead of bottom-to-bottom. This does away with the necessity for a piece of wood, because the lenses are further away already. It also makes the process of taking photos easier because the buttons are both on the top (although the one nearer the middle can be a bit finicky). It does mean that you get all your images wider than they are high, though, and these are harder to view than images higher than they are wide (because the eyes have to cross more to resolve them). If I use the two-camera technique, I almost invariably stick them bottom-to-bottom rather than side-by-side.
Once you've used up all your cameras' film and take them to be developed, you might want to warn the photoprocessors that the two cameras have virtually identical rolls in them. On more than one occasion I've had them worry that their machine is faulty because it's producing what looks like the same set of images from two separate cameras (which, of course, it is!). Keep the pairs of images together when you get them back, and write L and R on the reverse so you know whether they're the left or right image of their pair (but wait until the ink dries before putting one on top of the other - I've lost more 3D photos that way than any other!).
Scenes that make good 3D photos start close up and have things to look
at all the way back as they progress further away from the camera. Vertical
lines are particularly useful as cues to the eye, and can result in a
very nice illustration of depth.
![]() Example: Boats in a harbour.
That's Padstow harbour, Cornwall.
Example: Boats in a harbour.
That's Padstow harbour, Cornwall.
Image size: 2 x approx. 12K.
(Note: See how in the 3D view you can tell much more
easily to which boat the two red flags in the foreground belong).
Another good effect is when there are lots of small visual cues bunched
together. Large art installations, mobiles and fairy lights are great for
this.
![]() Example: Hotel lights.
Atrium of the Hyatt in Milwaukee, Wisconsin.
Example: Hotel lights.
Atrium of the Hyatt in Milwaukee, Wisconsin.
Image size: 2 x approx. 10K.
(Note: The reflections of other lights in the marble pillars are quite hard
to resolve in this image).
Finally, there's the old staple of vanishing perspective, whether
corridors inside buildings, alongside hedges or down long, straight roads.
If there's something easy to identify at the end that the eyes can use to
help line the images up, this subject matter can deliver some pretty
impressive stereoscopic views.
![]() Example: Platform 6.
Colchester North Station.
Example: Platform 6.
Colchester North Station.
Image size: 2 x approx. 9K.
Bad 3D pictures are in the main caused by the same things that make 2D
pictures bad - poor lighting, poor focus, poor composition etc.. You may
may be surprised with what you can get away with, though. So long as one
of the images is good, the other one can be quite a lot different and still
deliver a reasonable 3D composite image.
![]() Example: University podia.
Bottom of Square 5, Essex University.
Example: University podia.
Bottom of Square 5, Essex University.
Image size: 2 x approx. 8K.
Here, the left image is out of focus, but the 3D composite image you get
will appear to be in focus if your brain does its job properly. There's an
irritatingly hard-to-reconcile post in the lower left corner, but I wouldn't
bother persisting with it.
![]() Another example: Petunias.
Another example: Petunias.
Image size: 2 x approx. 23K.
This one has the right image out of focus.
There are, of course, pitfalls you need to watch out for that are peculiar
to 3D photography. The greatest problem is movement. Forget any scenes
that involve traffic, forget nature when there's a breeze, forget animals
or children unless they're asleep, forget running water, forget crowds. It
only takes one person to move in the distance to ruin an otherwise good
shot. It's infuriating!
![]() Example: Boat Quay.
Singapore.
Example: Boat Quay.
Singapore.
Image size: 2 x approx. 13K.
(Note: I didn't spot the guy walking in the lower right-hand corner. Between
snaps, he turned and climbed halfway up a flight of stairs. Notice how
much this minor detail stands out).
Movement of the photographs' subject is also a problem. People who think
they are staying absolutely motionless frequently fidget, which
leads to a mangled mess when you look at the resulting 3D image. Even
inopportune blinking can stop a picture from being perfect.
![]() Example: Jenny and
Madeleine in the kitchen.
Example: Jenny and
Madeleine in the kitchen.
Image size: 2 x approx. 7K.
(Note: Jenny moves her fingers between shots).
Although in general strong vertical lines are good, you mustn't let them
dominate the foreground. Otherwise, when you look beyond them, they keep
aligning and drawing you back to them. Strong horizontal lines can be
even worse - I won't inflict upon you the results of my experiments
photographing 3D pictures through Venetian blinds...
![]() Example: Graveyard.
Trinity Street, Colchester.
Example: Graveyard.
Trinity Street, Colchester.
Image size: 2 x approx. 12K.
Other problems include misaligning shots (so the area of overlap between
images is not a large as it should be) and camera rotation (the second
image has a different relationship to the horizon than has the first). Both
these can be cured by any decent computer arts package, though. What
can't be cured is when the two component images are taken either from
points too close to each other (so the 3D effect is subdued) or too
far apart (so the 3D effect is exaggerated).
![]() Example: Disneyland Paris statuette.
Example: Disneyland Paris statuette.
Image size: 2 x approx. 11K.
(Note: Those knees do not stick out that far!).
In general, you should avoid taking photos from moving vehicles. However,
there are exceptions if the vehicle is moving steadily and is a long distance
from what you're photographing. The single-camera technique here varies
in that you don't need to step a pace to one side because you're moving
anyway. Instead, wait a second or so, keeping your viewfinder on the
target, and then take picture number two. This works particularly well
from aeroplane windows, although I've also had some success from river
boats.
![]() Example: Mountains.
I don't know where...
Example: Mountains.
I don't know where...
Image size: 2 x approx. 10K.
(Note: The wings of the aeroplane move with the vantage point and
therefore look behind the rest of the image..!).
The 3D photographs I like the most are those that reveal vistas that simply aren't there in 2D photos. How many times have looked at a 2D picture and thought, "is that bit part of that, or part of that?". Impressive mountains don't look impressive in 2D; panoramic views seem flat and lifeless; arms look malformed instead of bent; sticky-out bits are as impressive as texture maps; ridges and outcrops seem part of cliff faces. Take 3D pictures, and all this changes!
As a final example, look at the following full-size 2D photograph:
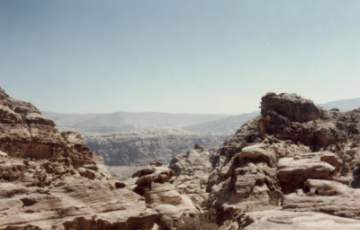
Now try it in 3D, and prepare to be amazed!
![]() Petra, Jordan.
Petra, Jordan.
Image size: 2 x approx. 11K.
Copyright ©
27th May :\webdes~1\ take3d.htm